How To Fix Gaming Mouse PTFE Skates Peeling At Corners?
Your gaming mouse feels sticky. It drags instead of gliding smoothly across your mousepad.
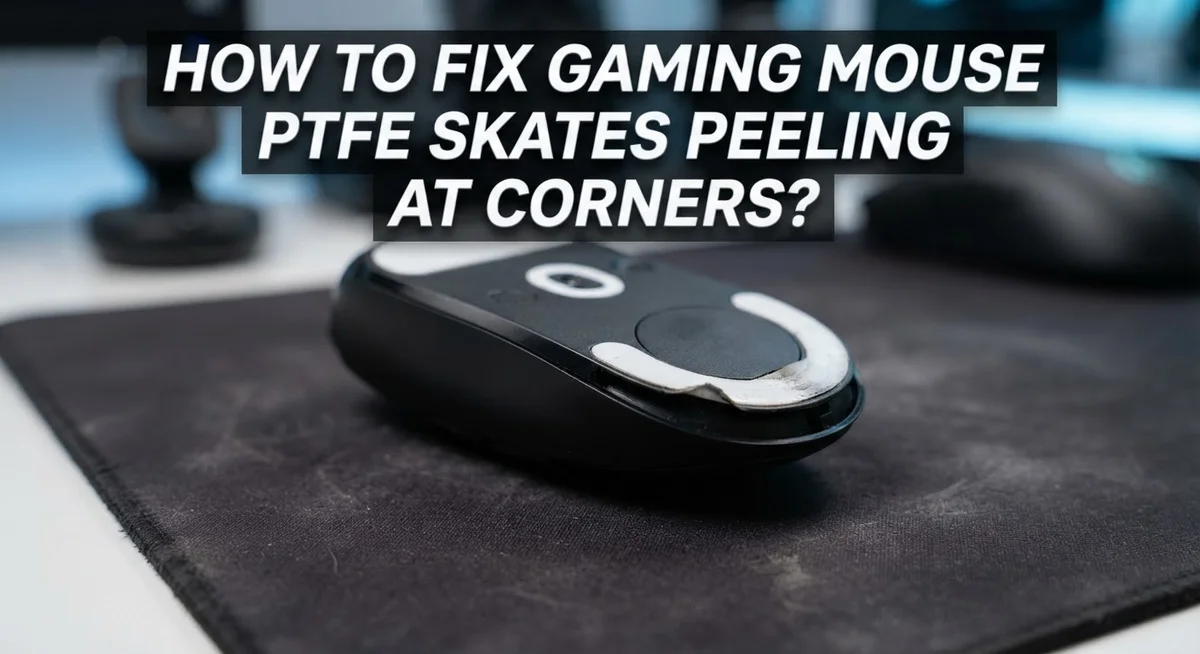
You flip it over and spot the problem. The PTFE skates are peeling at the corners.
This is a common issue for gamers. It happens after months of heavy use.
The good news? You can fix this problem yourself. You do not need to buy a whole new mouse.
In this article, we will show you why skates peel at the corners. We will explain the adhesive failure that causes this annoying issue.
In a Nutshell
- Corners peel first because adhesive wears out or fails there before anywhere else. This happens naturally over time with regular use.
- Full replacement works best. Partial patches or quick fixes only last a short while. They will not solve the root problem.
- Removal needs care. Use tweezers or a pry tool to lift skates from one edge. Clean leftover residue with rubbing alcohol.
- Pressure matters most during installation. Press new skates down firmly for at least 30 seconds. This step creates a strong bond and stops future peeling.
- Edges need extra attention. Many people rush this part and skip proper contact at the corners. This mistake causes the same peeling problem again.
- Avoid weak DIY fixes. Things like paper glue or punched materials might work for a day. They are not a real long term solution.
Why PTFE Skates Peel At The Corners
PTFE skates fail at corners because that area experiences the most stress. Your mouse moves in circular motions, and the corners catch edges on your mousepad first. This constant friction wears down the adhesive faster than the center of the skate.
The glue underneath PTFE skates has limits. It bonds well initially, but repeated lifting and pressing at corners breaks the bond. Heat from friction also weakens adhesive over time. When you drag your mouse across a surface, the corners peel upward before the middle does.
Adhesive failure happens gradually. You might not notice peeling for weeks or months. Then suddenly, one corner lifts. Once that happens, the problem spreads quickly. The exposed edge catches more often, and peeling accelerates.
Different mousepad textures speed up this process. Rough surfaces create more friction than smooth ones. Aggressive gaming styles with quick turns put extra stress on corners. Lighter pressure during initial installation also causes premature peeling.
The corner design itself creates vulnerability. Corners are the thinnest, most exposed parts of the skate. They have less surface area for adhesive contact. This means less grip holding them down compared to the center sections.
Moisture and dust affect adhesion too. If your hands are sweaty or your desk is dusty, particles get trapped under skates. This prevents the glue from making full contact with your mouse base. Corners suffer most because they’re hardest to press down evenly.
Understanding why peeling happens helps you prevent it. When you replace skates, you’ll know why pressing firmly for 30 seconds matters so much. You’ll understand why corners need extra attention during installation. This knowledge keeps your new skates lasting longer and performing better than before.
Tools And Materials You Will Need
Before you start the replacement process, gather everything you need in one spot. This saves time and keeps you focused on the task.
Removal tools come first. You’ll need tweezers or a small pry tool to lift the old skates without damaging your mouse base. A fingernail works in a pinch, but metal tools give you better control. Grab a microfiber cloth to handle the mouse without leaving fingerprints. Rubbing alcohol cleans adhesive residue left behind after removal.
For cleaning, stock up on supplies. Isopropyl alcohol works best because it evaporates quickly. Pour a small amount onto your cloth instead of directly on the mouse. This prevents liquid from seeping into the sensor or electronics. A dry cloth matters too. Use it after the alcohol dries to buff away any remaining sticky spots.
Installation requires precision tools. You’ll need a straight edge or ruler to help align new skates properly. This keeps them parallel to your mouse edges. Some people use a small weight or book to apply consistent pressure during the bonding process. Make sure whatever you use won’t damage the skates.
Organization prevents mistakes. Lay all items on a clean desk before starting. Keep your workspace clear of clutter and dust. Dust particles stick to fresh adhesive and ruin the bond. A well lit area helps you see corners clearly.
Final checklist before you begin. Confirm your tweezers aren’t bent or damaged. Test your cloth on a small area first to ensure it won’t scratch anything. Have your rubbing alcohol ready in a small container. Position your mouse under good lighting. Double check that your replacement skates match your mouse model exactly.
Step-by-Step: Removing Old Or Peeling Skates
Start by gathering your removal tools before you touch your mouse. You need tweezers or a small pry tool to lift the old skates without scratching the mouse base.
Get a clean microfiber cloth ready. This prevents dust from settling on exposed adhesive areas while you work.
Pour some isopropyl alcohol into a small container. You’ll use this to clean leftover adhesive residue after peeling the skates off.
Position your mouse on a flat surface with good lighting. You need to see the corners clearly where peeling starts.
Use your fingernail or the flat edge of your pry tool to lift one corner of the peeling skate. Work slowly and don’t rush this step.
Once you create a small gap, slide your tweezers underneath the skate. Gently pull the skate away from the mouse base at a shallow angle.
If the skate resists, stop and apply a tiny bit of heat. A hairdryer on low setting for 5 seconds softens the adhesive and makes removal easier.
Peel the entire skate away in one smooth motion. Don’t tear it into pieces, as this makes cleanup harder.
Repeat this process for all remaining old skates on your mouse. Work on one skate at a time to avoid confusion.
Now clean the mouse base thoroughly with your alcohol soaked cloth. Rub away all sticky residue and old adhesive traces.
Let the base dry completely for at least 2 minutes. Any moisture left behind prevents new skates from bonding properly.
Inspect the surface with your eyes and fingertips. The base should feel smooth and clean before installation begins.
Store your removed skates in a small bag if you want to keep them. Many people recycle or discard old skates since new ones work much better.
Step-by-Step: Cleaning The Mouse Surface Properly
Cleaning your mouse surface properly is essential before installing new PTFE skates. A clean base ensures the adhesive bonds correctly and prevents future peeling problems.
Start by wiping down the entire mouse bottom with a dry microfiber cloth. This removes loose dust and debris that could interfere with adhesion. Pay special attention to corners and edges where dirt accumulates most.
Next, dampen your microfiber cloth with isopropyl alcohol. The alcohol evaporates quickly and leaves no residue behind. Wipe the entire base surface where skates will attach. Make sure you cover every area the new skates will touch.
For stubborn residue from old adhesive, use gentle circular motions. Don’t scrub aggressively as this can damage the mouse plastic. Let the alcohol do the work by applying light pressure and patience. Repeat wiping until the surface feels smooth and clean.
Pay extra attention to the corners where peeling started. These areas need to be absolutely clean for new adhesive to grip properly. Any leftover glue particles will prevent the new skates from bonding securely.
Allow the alcohol to dry completely before moving forward. This usually takes one to two minutes. You can speed this up by letting your mouse sit on a clean desk in open air. Don’t rush this step.
Once dry, run your fingertip across the surface to check for smoothness. You shouldn’t feel any sticky spots or rough patches. If you do, repeat the cleaning process in those areas.
A properly cleaned surface is your foundation for success. This simple step dramatically reduces the chance of your new skates peeling at the corners again. The time you spend cleaning now prevents frustration later. Your replacement skates will last much longer when installed on a clean, prepared surface.
Step-by-Step: Installing New Skates Without Edge Peeling
Installing new skates correctly prevents peeling at the corners. This step matters more than most people realize because improper installation causes the same problem to happen again.
Start by positioning your mouse on a clean, flat surface with good lighting. Make sure the mouse isn’t moving around while you work. Remove one new skate from its backing and hold it above the mouse base. Line up the skate with the original position on your mouse bottom.
Press down firmly and evenly across the entire skate surface. Don’t just tap it lightly. Use steady, continuous pressure for a minimum of 30 seconds. This time allows the adhesive to bond completely with your mouse base. Many people rush this step and end up with peeling corners within weeks.
Pay special attention to the edges and corners. Apply extra pressure around these areas since they’re most likely to peel later. Press down with your thumb or a flat tool to ensure complete contact. The adhesive needs to grip the entire surface, not just the center.
Repeat this process for each remaining skate on your mouse. Install them one at a time to maintain control and accuracy. Don’t skip any skates, even if some aren’t peeling yet. Replacing all four skates at once ensures consistent performance and prevents future problems.
After installation, wait at least one hour before using your mouse. This gives the adhesive time to fully cure and harden. Some adhesives need even longer, so patience pays off here.
Check each corner after the curing time passes. Run your fingernail gently along the edges to confirm they’re secure. If you notice any lifting, apply pressure again immediately. Catching issues early prevents complete failure later on.
Common Mistakes That Cause Repeated Peeling
Peeling skates happen because of mistakes people make during installation or maintenance. Understanding these errors helps you avoid repeating them with your next set of skates.
Insufficient pressure is the biggest culprit. Many users press down lightly on new skates and assume the adhesive will bond automatically. This creates weak contact at the edges, especially in corners where stress concentrates during mouse movement. Your skates need firm, consistent pressure across the entire surface for at least 30 seconds. Light tapping simply doesn’t activate the adhesive properly.
Rushing the curing time causes major problems. Some gamers use their mouse immediately after installation because they’re eager to get back to gaming. The adhesive needs time to fully harden and set. Using your mouse too soon breaks the bond before it’s complete, leading to corner peeling within days.
Dirty surfaces underneath new skates trap air bubbles and prevent adhesive contact. If you don’t clean the mouse base thoroughly before installation, old adhesive residue creates gaps. These gaps become weak points where peeling starts, usually at corners first.
Improper skate alignment during installation matters more than people realize. Placing skates crookedly or at odd angles creates uneven pressure distribution. Corners end up with less contact than the center of the skate. This imbalance makes those corners peel faster during normal use.
Temperature and humidity also play roles in adhesive failure. Installing skates in cold environments slows adhesive activation. High humidity can prevent proper bonding too. Most adhesives work best in moderate conditions between 60 and 75 degrees Fahrenheit.
Finally, using worn out or low quality adhesive strips causes recurring problems. Old skates that have been sitting around lose adhesive strength. This guarantees peeling will happen again quickly.
Avoiding these mistakes means your next skate replacement will actually last.
Troubleshooting Persistent Corner Lift-Off
When corner lift-off keeps happening despite your best efforts, you need to understand what’s really going wrong. Persistent peeling usually means your adhesive bond never fully formed in the first place. This happens more often than you’d think, and the fix requires a different approach than a single replacement.
Start by examining exactly where the peeling occurs. Does it happen on all four corners, or just specific ones? If it’s always the same spots, your mouse bottom likely has uneven pressure points. Some mice have slightly curved or textured surfaces that prevent skates from making complete contact. You’ll need to press harder on those problem areas during installation.
Temperature matters more than most people realize. Cold environments slow down adhesive activation. If your room is chilly, the glue won’t stick properly no matter how much pressure you apply. Wait for warmer conditions before installing new skates, or let them sit in a warm room first.
Humidity also affects adhesive performance. Very dry air can cause adhesives to cure too quickly and crack. Moderate humidity (around 40-60%) works best for most adhesive types.
Another common culprit is incomplete surface cleaning. Invisible dust or residual adhesive creates a barrier between your new skates and the mouse bottom. Even after cleaning with alcohol, particles can remain in corners. Use a dry microfiber cloth to wipe the entire surface one final time before installation.
If corners keep lifting after you’ve addressed these factors, your mouse might have a structural issue. Some gaming mice have slightly raised edges or manufacturing imperfections that prevent skates from sealing properly. In this case, you might need to apply extra pressure specifically to the corners during installation, holding firm pressure for 60 seconds instead of 30.
Final Thoughts
Peeling PTFE skates can feel frustrating. But now you know exactly why it happens and how to fix it.
Adhesive failure at the corners is the main cause. Dust, moisture, and light pressure during installation all play a part.
The good news is that fixing this problem does not require special skills. Clean removal and careful reinstallation solve most cases right away.
Remember that pressure matters more than anything else. Press each skate firmly for at least thirty seconds. This step alone prevents most future peeling.
Temporary fixes like paper glue or punched materials might get you through a gaming session. But they will not last. Think of them as short term patches, not real solutions.
Replacement skates remain the most reliable option for long term performance. They restore smooth glide and even contact across your mouse’s surface.
If your corners keep lifting despite doing everything right, check your mouse for deeper issues. Sometimes the base itself has warped or damaged spots that affect adhesion.
Clean surfaces, correct alignment, and patience during curing time make all the difference. Skip any of these steps and peeling will likely return.
Good habits prevent this problem from coming back. Keep your mousepad clean, avoid extreme humidity, and check your skates every few weeks.
Small maintenance checks now save you time and frustration later. Catching early signs of lifting means you can fix things before they get worse.
Gaming mice depend on smooth, consistent glide to perform well. Healthy skates directly affect your aim, speed, and comfort during play.
Taking a few extra minutes during installation pays off. Your mouse will glide better and last longer.
With the right approach, corner peeling becomes a rare problem instead of a constant headache. Stay consistent with these steps and your skates will stay firmly in place session after session.
Frequently Asked Questions
Why do PTFE skates peel at the corners specifically?
Corner peeling happens because adhesive bonds weaken at the edges first. The corners experience more stress during mouse movement and lifting. Heat and humidity also affect the adhesive around edges more than the center. When you apply pressure during installation, the middle gets firm contact while corners sometimes miss full adhesive contact.
Can I use a temporary fix instead of replacing the skates?
Temporary fixes exist but they are not reliable long term. Some people use paper glue or punched materials to hold corners down during gaming sessions. These solutions work for a few hours at best. The adhesive will fail again quickly because temporary fixes do not bond properly to the mouse surface.
What’s the most important step when installing new skates?
Applying firm, even pressure for at least 30 seconds is critical. Many users press down lightly and expect the adhesive to hold. Light pressure leaves air gaps, especially at corners. Press down hard across the entire skate surface. Hold that pressure for the full time. This single step prevents most peeling problems.
Should I remove all old skate residue before installing new ones?
Yes, absolutely. Old adhesive residue creates a barrier between your new skates and the mouse surface. Use rubbing alcohol and a microfiber cloth to clean the area completely. Let the surface dry fully before applying new skates. A clean surface ensures the adhesive bonds properly and prevents corner lifting.
How long should I wait before using my mouse after installing new skates?
Wait at least 24 hours before heavy gaming. Some adhesives need full curing time to reach maximum strength. Using your mouse too soon puts stress on the bond before it fully sets. This causes corners to lift. Patience during this waiting period saves you from repeat peeling problems.

Hi, I’m Archie Flynn, the founder and writer behind RapidResizerHub! 👋 I’m a passionate tech enthusiast who loves exploring the latest gadgets, smart devices, and trending electronics on Amazon. Through my honest, hands-on reviews and detailed buying guides, I help readers make smarter, well-informed shopping decisions.